
Live Face Swap Controls in ClapClip for Windows
ClapClip Team · Published on 2026-11-08 · 7 min read
A live face swap has no second take. The webcam frame arrives, the face is found, matched, swapped and blended, and the next frame is already here. What makes that look stable rather than flickery is a handful of controls, and ClapClip for Windows exposes the same ones it uses for video, with presets written in plain language instead of thresholds. This guide explains each control, what the presets actually set, and where to start.
It covers the live tool in ClapClip AI for Windows. The free online tool at faceswap.free swaps photos and GIFs in the browser and has none of these controls because it does not need them.
Key takeaways
- Two views. Dual View shows camera and result side by side; Mirror View flips the result the way you see yourself in a mirror.
- Two detectors, two presets each. Id recognition decides whether a face is the same person from frame to frame; face detection decides how clear a face must be to count. Both are presets, not sliders.
- A face map list assigns which detected face gets which source face, so a two-person frame stays correct.
- Four fusion models (Baseline, Robust, Balanced, Accurate) and two blend controls (edge blur 0–1, fusion area 0–50) are the same ones the video tool uses.
- Face Restore adds a portrait pass with a Natural or Stronger model.
- Everything runs on your GPU, locally; nothing from the camera is uploaded.
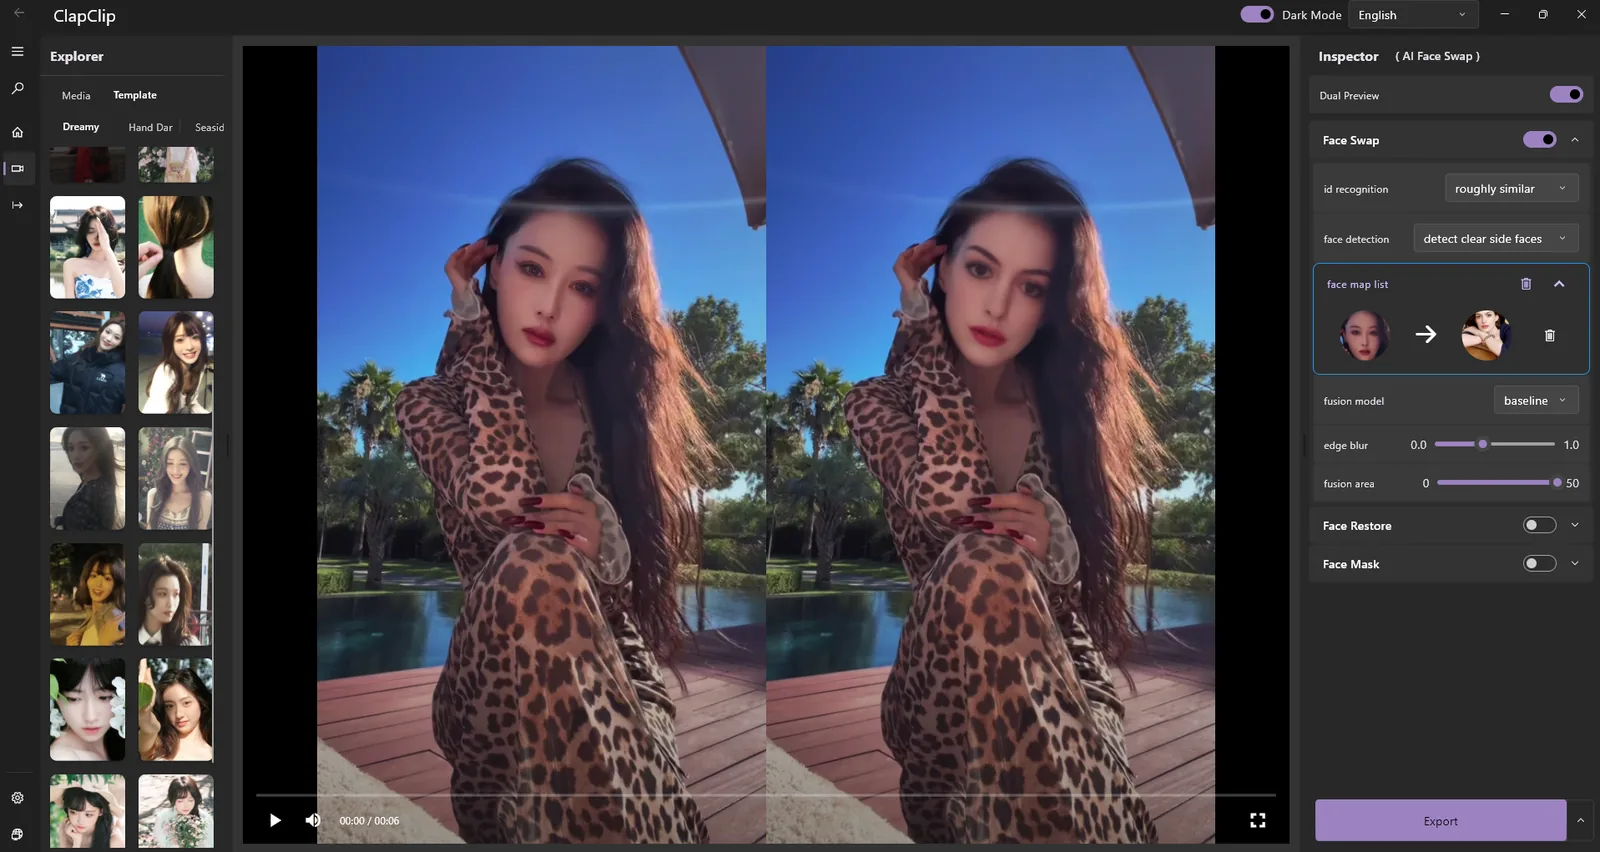
The inspector above is the video tool's; the live tool shows the same controls over the camera feed, which is why learning them once covers both.
The two views
Dual View puts the camera feed and the swapped result next to each other. Use it while you adjust settings: a change in the detector or the blend is visible immediately against the original.
Mirror View flips the result horizontally so it behaves like a mirror. Most people find it easier to position themselves this way, because moving left moves the image left. Switch back to Dual View when you want to judge the swap itself.
Id recognition: is this the same person?
Between frames, the tool has to decide whether the face it sees is the one it swapped a moment ago. Too strict, and a head turn makes the swap drop out and snap back; too loose, and a second person walking into frame inherits the swap. The presets set that tolerance:
| Preset | What it means |
|---|---|
| ALL: same person | Every face is treated as the same person. Use when you are certain only one face will ever appear |
| Slightly similar | Very tolerant matching |
| Roughly similar (default) | The balance that suits one presenter at a desk |
| Exactly similar | Strict matching |
| Completely similar | Strictest; a face must match closely to keep the swap |
Rule: alone on camera, leave the default or go looser. With a second person who should not be swapped, go stricter and use the face map list.
Face detection: how clear must a face be?
The detector has a confidence bar below which a face is ignored. The presets describe what passes:
| Preset | Passes |
|---|---|
| Detect clear front faces | Only sharp, frontal faces |
| Detect clear side faces (default) | Sharp faces including profiles |
| Detect blurry front faces | Frontal faces even when soft |
| Detect blurry side faces | Almost anything face-shaped, including soft profiles |
Lower presets catch more faces and also more false ones; in a cluttered background a poster or a reflection can start being swapped. If the swap drops when you turn your head, step down one preset. If something that is not a face is being swapped, step up.
The face map list
When more than one face is in frame, the face map list shows the detected faces and lets you assign a source face to each, or leave one unswapped. This is how a two-host stream swaps one person and not the other, and how a guest who walks in does not inherit your face. It uses the same identity matching as id recognition, so a looser recognition preset makes the mapping more forgiving of movement and a stricter one makes it more precise.
Fusion model
The four models are the ones the whole app uses:
| Model | Works on | Character |
|---|---|---|
| Baseline | 128 px face | Fastest; fine for clear, frontal faces and the lowest-end GPUs |
| Robust | 256 px face | Tolerates wider head angles and harder lighting |
| Balanced | 256 px face | Detail, stability and speed in balance; the usual choice |
| Accurate | 256 px face | Most detail; worth trying when the others look soft |
Live is the one place where speed is part of quality: a model that cannot keep up with the camera produces a stutter no amount of detail compensates for. Start with Balanced; if the frame rate drops, go to Baseline; if you have headroom, try Accurate.
Edge blur and fusion area
Two blend controls finish the swap:
- Edge blur, 0 to 1, default 0.4, softens the boundary between the generated face and the original skin. Raise it if a seam is visible around the jaw or hairline; lower it if the face looks hazy.
- Fusion area, 0 to 50, default 50, sets how much of the generated face layer is kept before blending. Lower values keep more of the original face around the edges, which helps with glasses, beards and hands that cross the face.
Rule: a visible seam is an edge blur problem; a feature in the wrong place is a fusion area or model problem.
Face Restore
A portrait pass can run on the swapped face: a lighter option that keeps the camera's look and a stronger one for when the camera is soft or the light is poor. It costs GPU time per frame, so switch it on after the swap itself is running smoothly.
Starting settings
For one person at a desk with a typical webcam: Roughly similar, Detect clear side faces, Balanced, edge blur 0.4, fusion area 50, Face Restore off. Watch Dual View for a minute while turning your head and leaning in; adjust one control at a time, in this order: detection preset, then model, then edge blur. Add Face Restore last.
Everything in this chain runs on your own GPU. The camera feed, the swapped output and the source photo stay on your PC.
Bottom line
A stable live swap is a stability problem before it is a detail problem. Set the detectors so the face is found every frame and stays the same identity, map faces explicitly when there is more than one, choose the model your GPU can run at camera speed, and only then tune the blend and add restoration. The video face swap guide on faceswap.free covers the same controls when there is time for a second take, and the face swap FAQ answers the safety and privacy questions.
Related guides
Related ClapClip tools
Desktop Face Swap App
Download a private face swap app for Windows 10 and 11. Swap faces in videos and photos locally with live preview, GPU acceleration, and no uploads.
AI Video Face Swap
Swap faces in any video clip with frame-by-frame AI tracking, a live preview, and fully local processing on your Windows PC.
Local Face Swap
100% on-device face swap — no uploads, no cloud queue, no limits. The private, offline alternative to online face swap tools.